In earlier post I described interfacing DS18B20 programmable digital temperature sensor with ESP8266 NodeMCU board and displaying temperature on OLED display. That required knowledge of programming, basic electronics and required a bit of electronics hardware too. Here, I managed (with the help of several google searches ;)) to interface the DS18B20 with my laptop using cheaply available USB to RS232 converter. And with the help of free software "OneWireViewer" from Maxim Integrated; we can program resolution, view temperature readings or save the data in text or excel files. The best thing is we do not need any microcontroller, microprocessor, Arduino or Raspberry PI etc.
Note:- I am using following abbreviations for personal ease-
UTC = USB to RS232 TTL Converter
DS = DS18B20
[A] Installing drivers for USB to RS232 TLL converter (UTC) with Prolific PL2303HX IC.
Getting these cloned, cheap UTC to work in Windows is a bit tricky. We need to have right drivers to get it detected in our Device Manager of windows PCs.
The working drivers for windows 7 and 8.1 can be found here. Download this zip file and extract to some known folder. May be these work also with windows 10 etc, I would be happy to know results if someone tries this.
(following sequence is for windows 8.1 PC - similar procedure needs to be followed for Windows versions).
1) Press Windows button of your PC and search for Device Manager
2) Open Device manager and expand Ports (COM & LPT) section. Insert UTC into USB port of the PC.
3) After sometime, if drivers for the UTC are not present on your PC, an error will be indicated by Yellow triangle next to "Prolific USB to Serial Comm Port (COMxx)".... Do not Panic.
4) Follow sequences as shown in my video starting here
5) After installation of drivers, Yellow triangle should disappear- note down the COM port number for later use.
6) After installation of drivers for converter, download the OneWireViewer PC interface software from official page of Maxim here. Choose correct operating system of your PC and whether it is 64bit or 32 bit OS.
7) Follow Step B for hardware wiring between DS and UTC
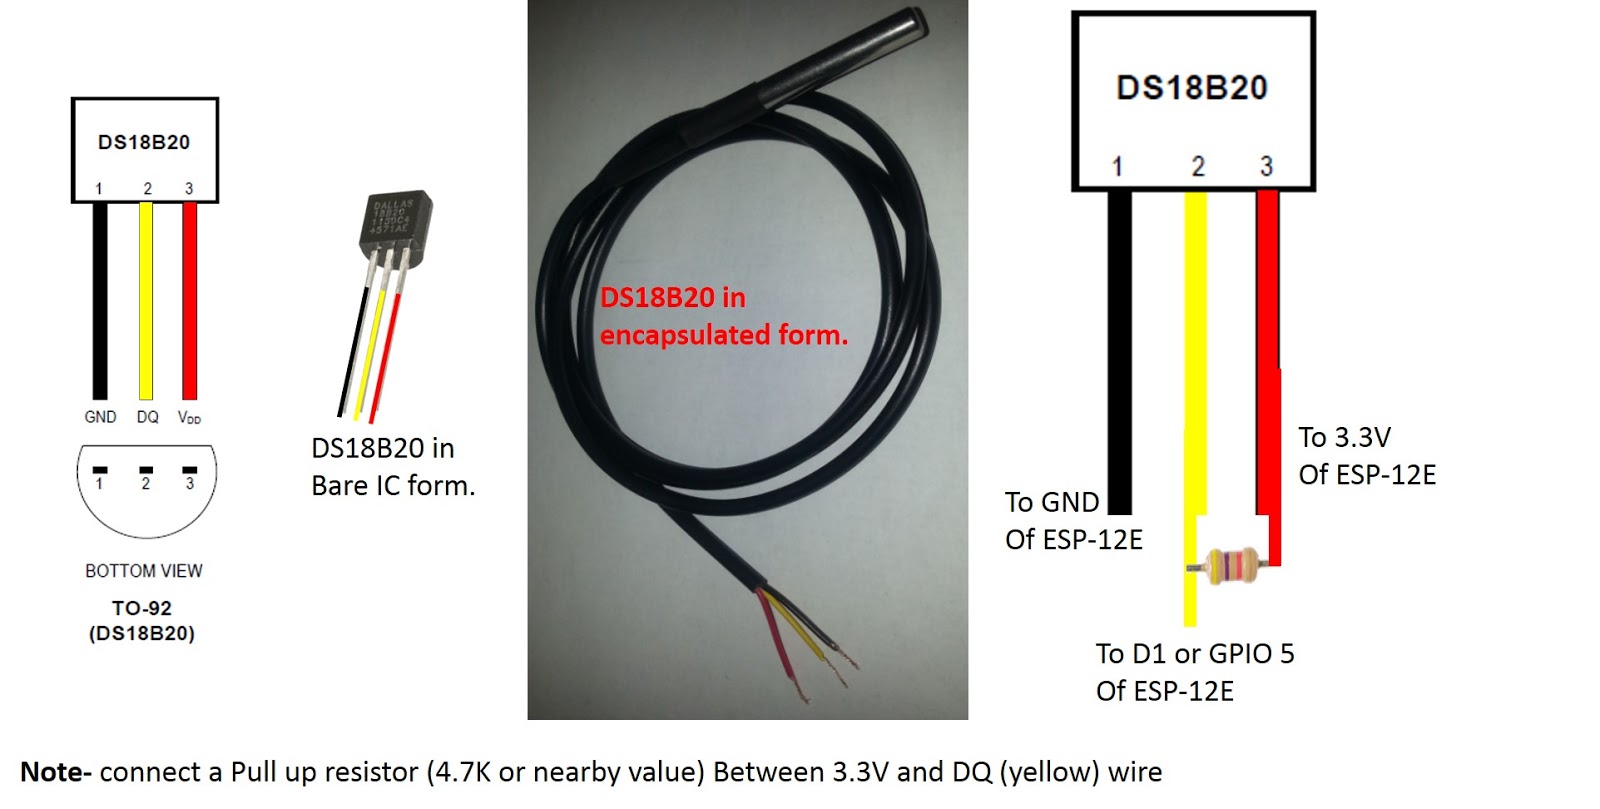
[B] Hardware connections between DS18B20 and USB to RS232 TLL converter (UTC)
1) Since DS18B20 is a 1-wire device/sensor that can be powered in Parasite mode, I have shorted the Receive (RXD) and Transmit (TXD) pins of UTC and connected it to data or DQ (Yellow wire/pin 2) of DS18B20.
2) The ground GND (Black wire/pin 1) and Power VDD (Red wire/pin 3) are shorted together and connected to ground GND of UTC.
Refer my video section here for exact wire connections and pin information.
[C] OneWireViewer software from Maxim to read the temperature from DS18B20
** First remove the UTC from USB port of your PC during installation of OneWireViewer software.
1) Download the OneWireViewer and drivers from the official page of Maxim Integrated for 1-wire/iButton sensors, here.
2) After installing the software+drivers, Insert UTC into USB port and make connections between UTC and DS. and open the OneWireViewer software.
3) Once software starts for the first time, it asks for the Adapter name and USB port number, refer this section of my video.
4) Insert the COM port number that we had noted in step [A - 5] above and click OK.
5) On the Top left side, you should see the unique 64bit ID of the connected DS18B20, click on that and then on the tab named Real-time Temperature and explore other settings.... to enjoy temperature readings :).
[D] Bill of materials
1) DS18B20 from http://aliexpress.com Link
2) USB to RS232 TTL converter with Prolific PL2303HX IC from www.amazon.it Link
3) Few Male-Female SIL Socket Row Strip PCB Connector from www.banggood.com Link
4) 2 Wires, soldering equipment and other accessories.
Copyright (c) 2020 By Electromania blog - https://theelectromania.blogspot.com/
No content of this blog should be copied, distributed, printed without prior permission from owner of this blog.